
I did a couple of videos with Dr. Emily Shoerning of American Resiliency. Check them out!
Retrofits for Climate Resilience
Hi all,
I’m teaching a community ed class in Boise called “Home Retrofitting for Climate Resilience”. I’ve decided to post my slideshows here as well (with added text and a little more generalized information) in the hopes that they can help others. Some of this can be pretty U.S. specific, and a lot of it assumes that you’ve got a wood-framed house, but there’s also information that can apply to different areas & building types.
These will be continual works in progress, and I’d love to get feedback from people - if you have anything you think should be added or edited, please get in touch!
The risks and strengths of your home and location (Boise edition)
Sun and Shade: Windows
The weather in Boise can be a rollercoaster. Summers hit triple digits for days on end. Winters dip into the teens or single digits at night. It can be hard to keep your home a comfortable temperature without spending a small fortune on energy bills.
Windows are one of the biggest sources of heat loss and heat gain. In the winter, your home can lose 30% or more of its heating energy through windows. In the summer, direct rays from the sun can make the rooms on the south and west sides of your home feel like a greenhouse. By choosing proper interior and exterior window coverings and being strategic about using them, you can save money on your bills and keep your home feeling much more comfortable.
A great resource for window covering information is from Energy.gov
Shades & Curtains
Simplest solution, renter friendly
These reduce day and nighttime heat loss through windows when it’s cold and reduce unwanted solar heat gain through windows when it’s hot. They also reduce cold drafts near windows.
Insulated cellular shades have the highest R-values (insulative values) of all window coverings. The honeycomb cross-sections are filled with air pockets, which act as insulation. Make sure they fit tightly inside the window trim; the best overall R-value shades operate on side tracks. If you can, look for products certified with the Attachments Energy Rating Council (AERC) Energy Improvement rating.

Pelmets & heavy curtains also work well to prevent temperature fluctuations from solar heat gain and loss. Studies demonstrate that draperies with white-plastic backings can reduce heat gains by 33% during the summer. And using a pelmet across the top will keep your room warm and cozy during the winter. Warm air sinks on the curtain side of the windows rather than against the cold glass, keeping the warm air to the inside of the curtains, rather than losing heat through the window pane.

Don’t forget to open your shades & curtains during winter sunlit hours! Heat gains from the sun in wintertime are helpful for warming your home. Some companies offer window coverings with automated options. But if you’d rather save some money, set a reminder on your phone to open & close your window coverings until it’s a habit.
Awnings & exterior shades
Intermediate solution, needs a little DIY know-how
76% of the sunlight that falls on double-pane windows enters your house as heat. To truly cut out solar gain, prevent the sun from hitting the glass in the first place! Awnings and exterior shades provide the benefit of shading windows during the summer, while still allowing daylight and views through your windows.
Awnings are projections on a home’s exterior that shades windows from the sun. They can be fixed or retractable, and are typically either metal or a synthetic fabric material. If they are fixed awnings, make sure to size them effectively so that they block summer sun angles, but allow winter solar gain. A great tool to play with is here - in general for Boise’s latitude, try to keep the depth of south-facing overhangs at least 1/2 of the height of the window. And the wider you make it, the more of the window will be protected from the sun in the mornings and afternoons.

Bahama shutters, also known as Bermuda shutters, are storm-resistant types of exterior shades that have been used in hurricane-prone areas for centuries. They hinge from the top of windows and can be closed tight against the window when a storm is approaching. Most models have louvers to give some transparency and airflow since they hang in front of windows. They aren’t the best option for promoting solar heat gain in wintertime, but if you are looking to combine shading, storm resistance, and privacy for your exterior window coverings, they are a great option.

Exterior window shades are a synthetic fabric screening that rolls up into a protected valance at the top of the window. Solar heat gain through the shade depends on the openness of the fabric weave and on the transparency of the fabric itself. Roller shades are most commonly lowered or raised by hand; some are operated from the outside, and others can be operated from inside using a through-the-wall crank. The shade frames are typically anchored in place, but some low-cost systems attach manually using suction cups, Velcro, or snap systems.
fast ideas
for emergency heat events
The low-cost exterior temporary shades presented above are an EXCELLENT measure to have on hand for heat waves or heat domes, even if you don’t plan on using them regularly. In a pinch, a light-colored sheet tacked around the outside of your window frame could serve the same purpose. Anything that helps keep the sun off your glass!
Wall Details
Wall details are small drawings sliced through a section of wall to show how walls, particularly exterior walls, will be constructed. Depending on the size and complexity of a project, an architect might have a dozen different types of walls that they need to show. In a residential project, there are typically only a couple of wall types. A good exterior wall should ideally have structure, control layers, insulation, cavity, and cladding.
Why do we need wall details?

Traditional 2x6 framed walls. They’re pretty much the default, but we can do better.
Different locations require different solutions. A wall in Alaska that has to insulate a home from -40°F temperatures and withstand snow building up along its base should look very different than a wall in California where earthquakes and fires are a concern, but the temperature is much more moderate.
Building technology is constantly changing. In the 15 years since I graduated college, we have gone from building cavity insulated walls with siding installed directly on top of building wrap, to understanding the benefits of using insulation on the outside of studs and utilizing rainscreen systems. And there are dozens of different materials that builders and architects can use in even the simplest exterior wall. It’s good to make sure that the contractor, subcontractors, architect, and homeowners are all on the same page by detailing everything.
The permit office wants to see them. Most places in the U.S. adhere to some edition of the International Residential Code, which has over 180 pages dedicated to proper wall construction. The city/county in charge of permitting wants to see that information in the drawings, and they’ll also inspect onsite to make sure that everything is installed correctly.
At this point, I get excited about walls & start lecturing. sorry about that.
A couple of my favorite 6” stud wall types to use in our climate are below:

I also really like Rockwool comfortboard in place of the EPS, especially in WUI zones. In that case, I’d relocate the building wrap!
In Boise, at the time I wrote this article, all residential projects need to have R20 or R13+5 insulation. R13+5 means that R13 is between the wall studs, with R5 on the OUTSIDE of the studs. You’ll notice that I’m a big fan of the R13+5 (or greater). Why? Wood studs are fairly thermally conductive! You can see this on many homes with cathedral ceilings (unvented roof structures) when it has snowed. There are melted stripes! That is warm air from inside the home leaking out through the studs. Between the studs is well-insulated, so the snow sticks. Wrapping wall studs with a layer of exterior insulation breaks that thermal bridge and insulates much better than only stuffing insulation between wall studs.

Image from heepsheap.wordpress.com - you can tell a lot about a building’s insulation by the snow melt patterns on the roof!
Ok, so what’s the deal with the air gap? That’s called a rainscreen. No building envelope is 100% waterproof – things like screw holes and joints in cladding (siding) are weak points where water can slip into the wall. Caulk is great, but it eventually fails. The rainscreen is a drainage plane directly behind the cladding that allows moisture to easily drain away from the building. The air that flows between the cladding and wall accelerates evaporation of any residual moisture. It’s a very efficient way to mitigate the risk of moisture intrusion and all of its unfortunate side-effects: things like musty odors, drywall discoloration, mold, and rot.

Rain drains freely down the wall & exits to the outside vs. capillary action into your house. It’s extra effort up front, but can save you money and headache in repairs later.
So make sure that your architect or builder is giving careful thought to your wall construction. Great construction is a little different today than it used to be. And if you’re the kind of person who finds this stuff interesting (my kind of nerd!), check out @buildingsciencefightclub on Instagram. She has great insights on why buildings fail, and how to build properly so they stay dry and warm.
Building Sections
Hi! I’ve started a series of posts to help homeowners understand what their architect will provide in final drawings. If you haven’t already, please check here to understand what type of project you have, so that you can check through the drawing list. Since each project is different, its drawing set will look slightly different too… but the project type page is a good place to start.
So, without further ado…
Building sections
Building sections are one of my favorite things to draw. Imagine if you took a building, cut a vertical line right across and all the way through it, peeled off the back half, and peered inside.

The Nefelejcs Projekt by Merge Invisible
It would look kind of like this, right? This is the Nefelejcs Projekt by Merge Invisible in Budapest, Hungary. It’s a thought-provoking urban art project, using data from the city archives and information from neighbors to recreate and mourn torn-down buildings in the 8th district. Save your old buildings and reuse them, folks.
Sorry, got distracted by art.
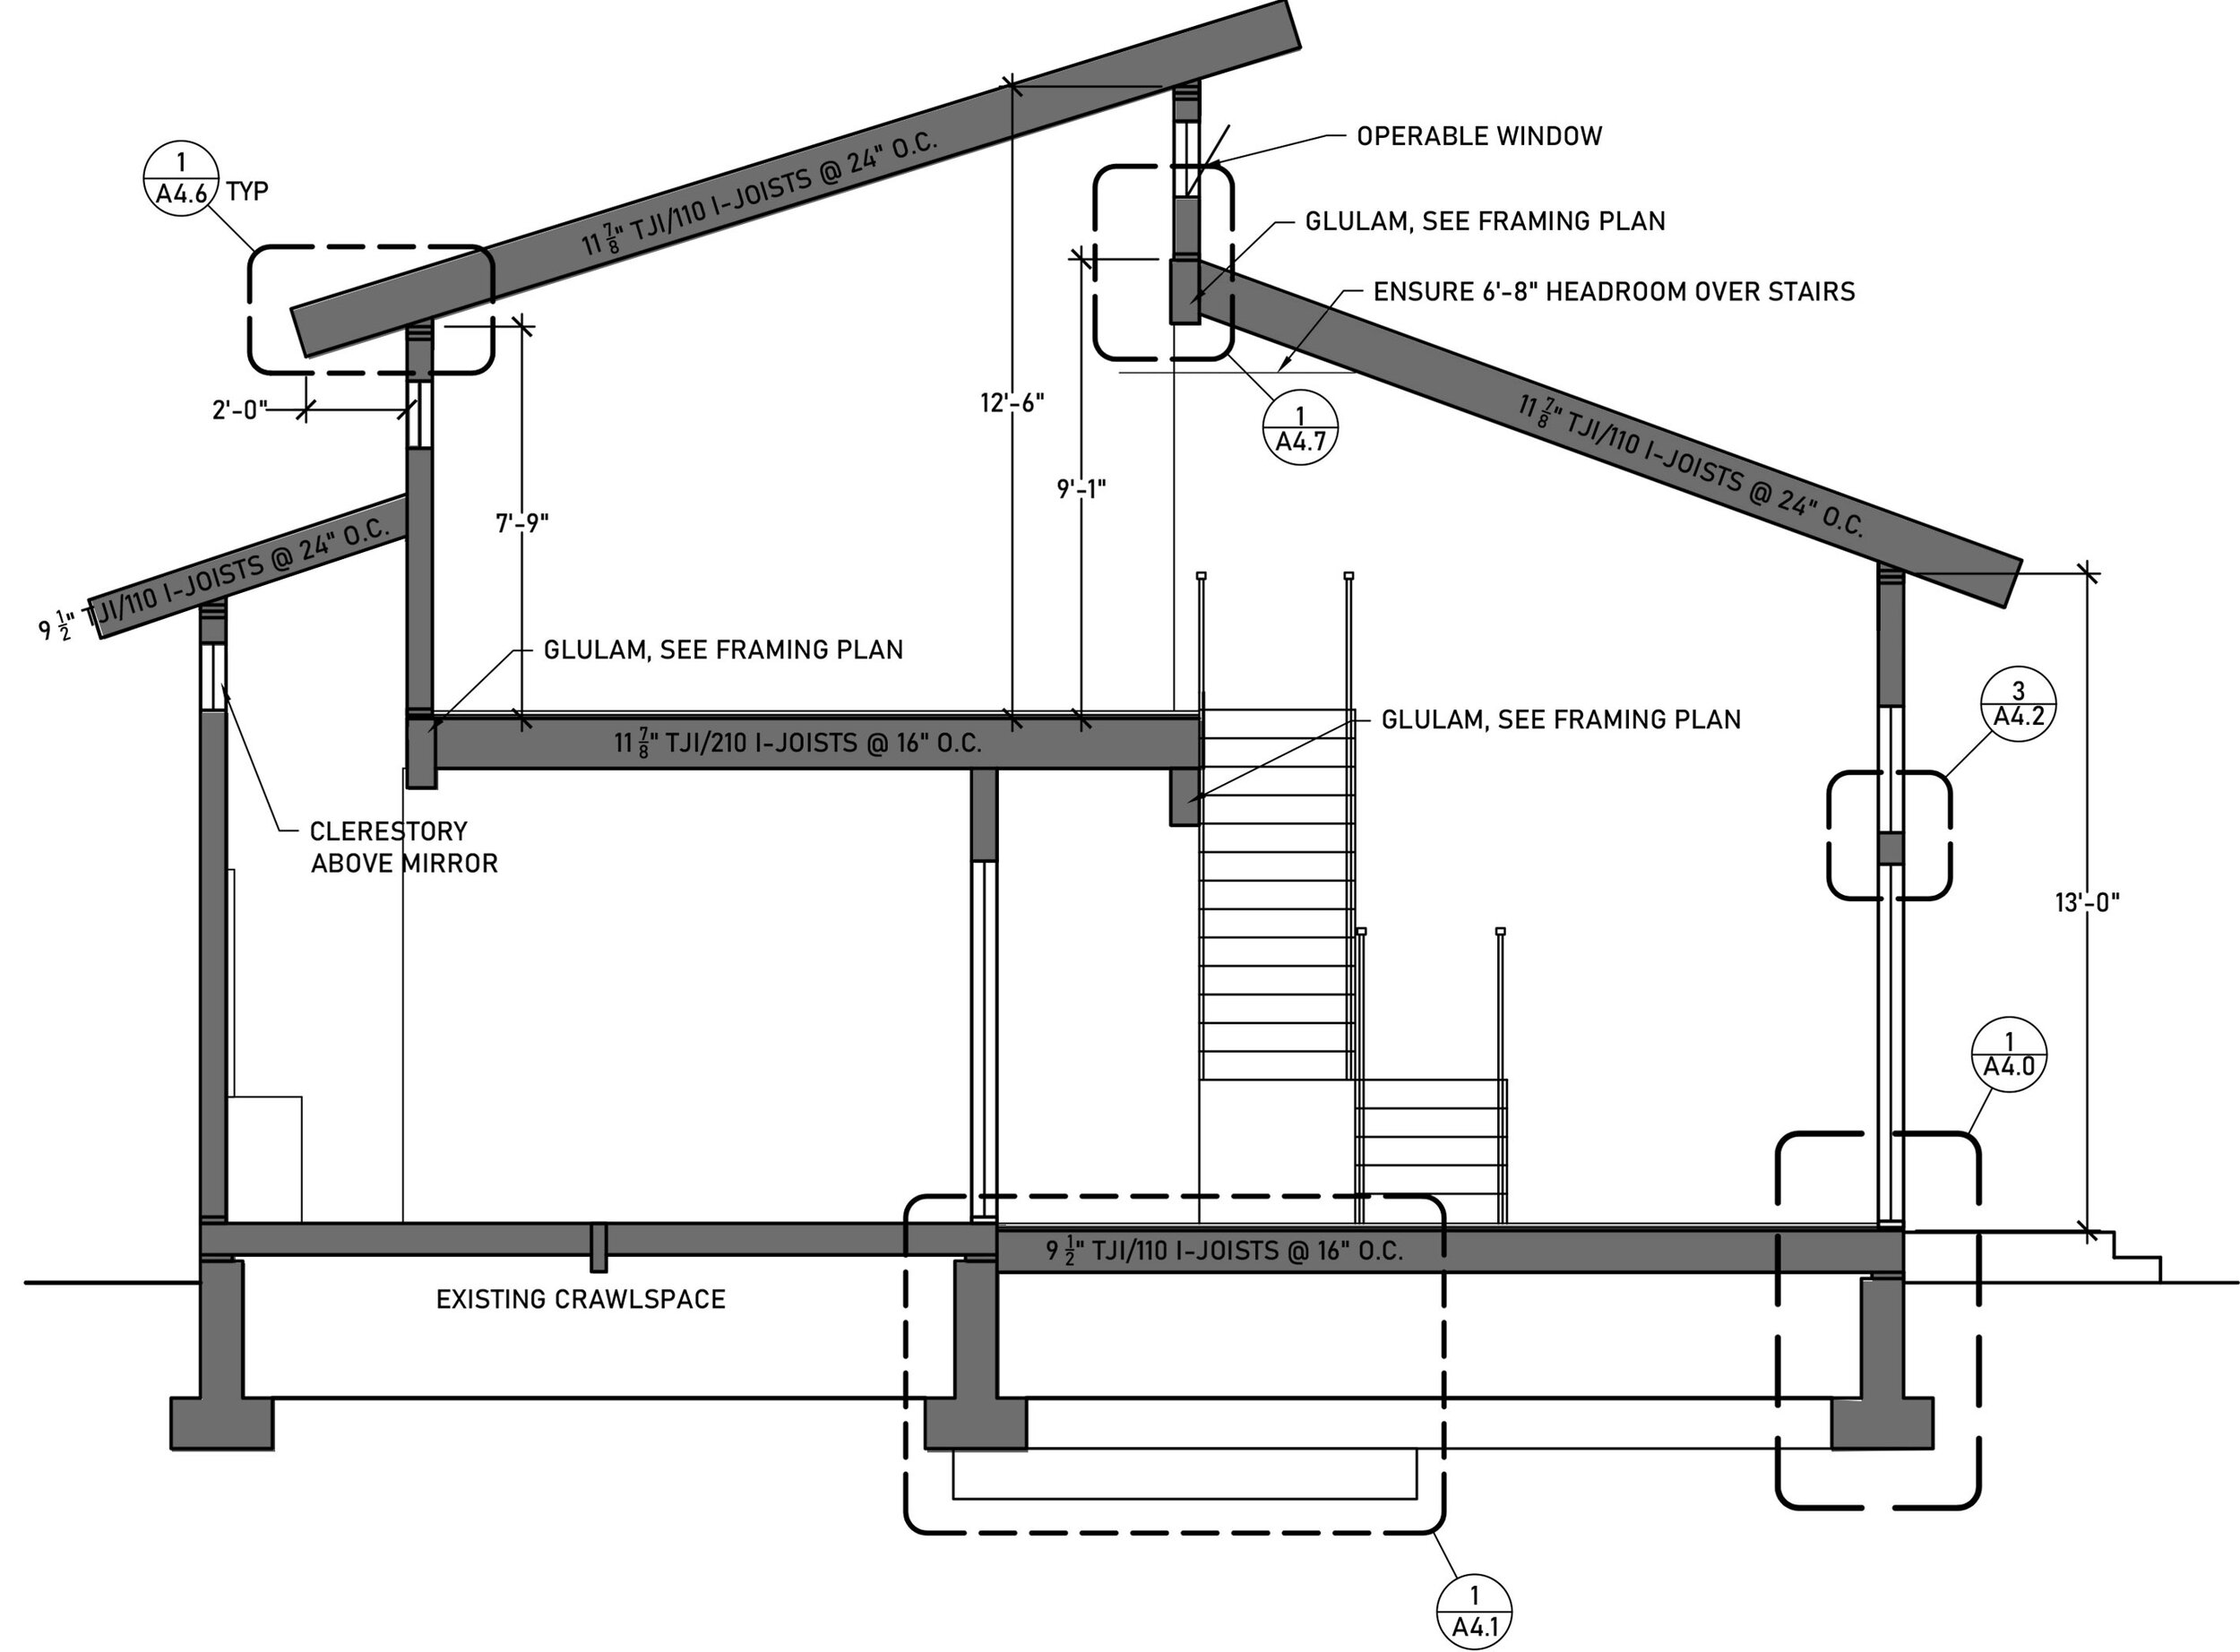
Building sections are incredibly useful tools for architects, engineers, and contractors. They help designers understand the constraints of a space. I use them a lot during design development to check stair clearances, joist depth, and ceiling heights. They’re important when coordinating various building components - if that overhead beam is 16” deep and a duct needs to run underneath it to get to the next room, what’s that going to do to our ceiling height??
Not only is a building section visually informative, but it’s also a road-map for construction details.

These bubbles pop up everywhere. They’re known as “callouts” and indicate that an area of construction is either atypical or very important to get right. You’ll see them circling footings, structural connections, windows, and roof eaves. They’ll have two numbers indicated. The top is the drawing number, the bottom is the page number. So for the callout above, you’d check drawing 3 on page A4.11 to see a larger detail of that building assembly.
There you have it. Building sections. They might look like just another drawing, but in terms of understanding the constructability of a building, they’re the MVP.
Reflected Ceiling Plans
Hi! I’ve started a series of posts to help homeowners understand what their architect will provide in final drawings. If you haven’t already, please check here to understand what type of project you have, so that you can check through the drawing list. Since each project is different, its drawing set will look slightly different too… but the project type page is a good place to start.
So, without further ado…
Reflected Ceiling Plans!
RCPs are exactly what they sound like – looking at a view of the ceiling as if there were a mirror on the floor reflecting the ceiling back at you. It sounds complicated, but once you look at one, it’s actually pretty intuitive. It’s done this way so that the orientation of the floor plan and ceiling plan is the same. If you wanted to show the ceiling as if you were on the floor looking up, the plan would be reversed (and harder to read when compared to the floor plans). So. Reflected it is.
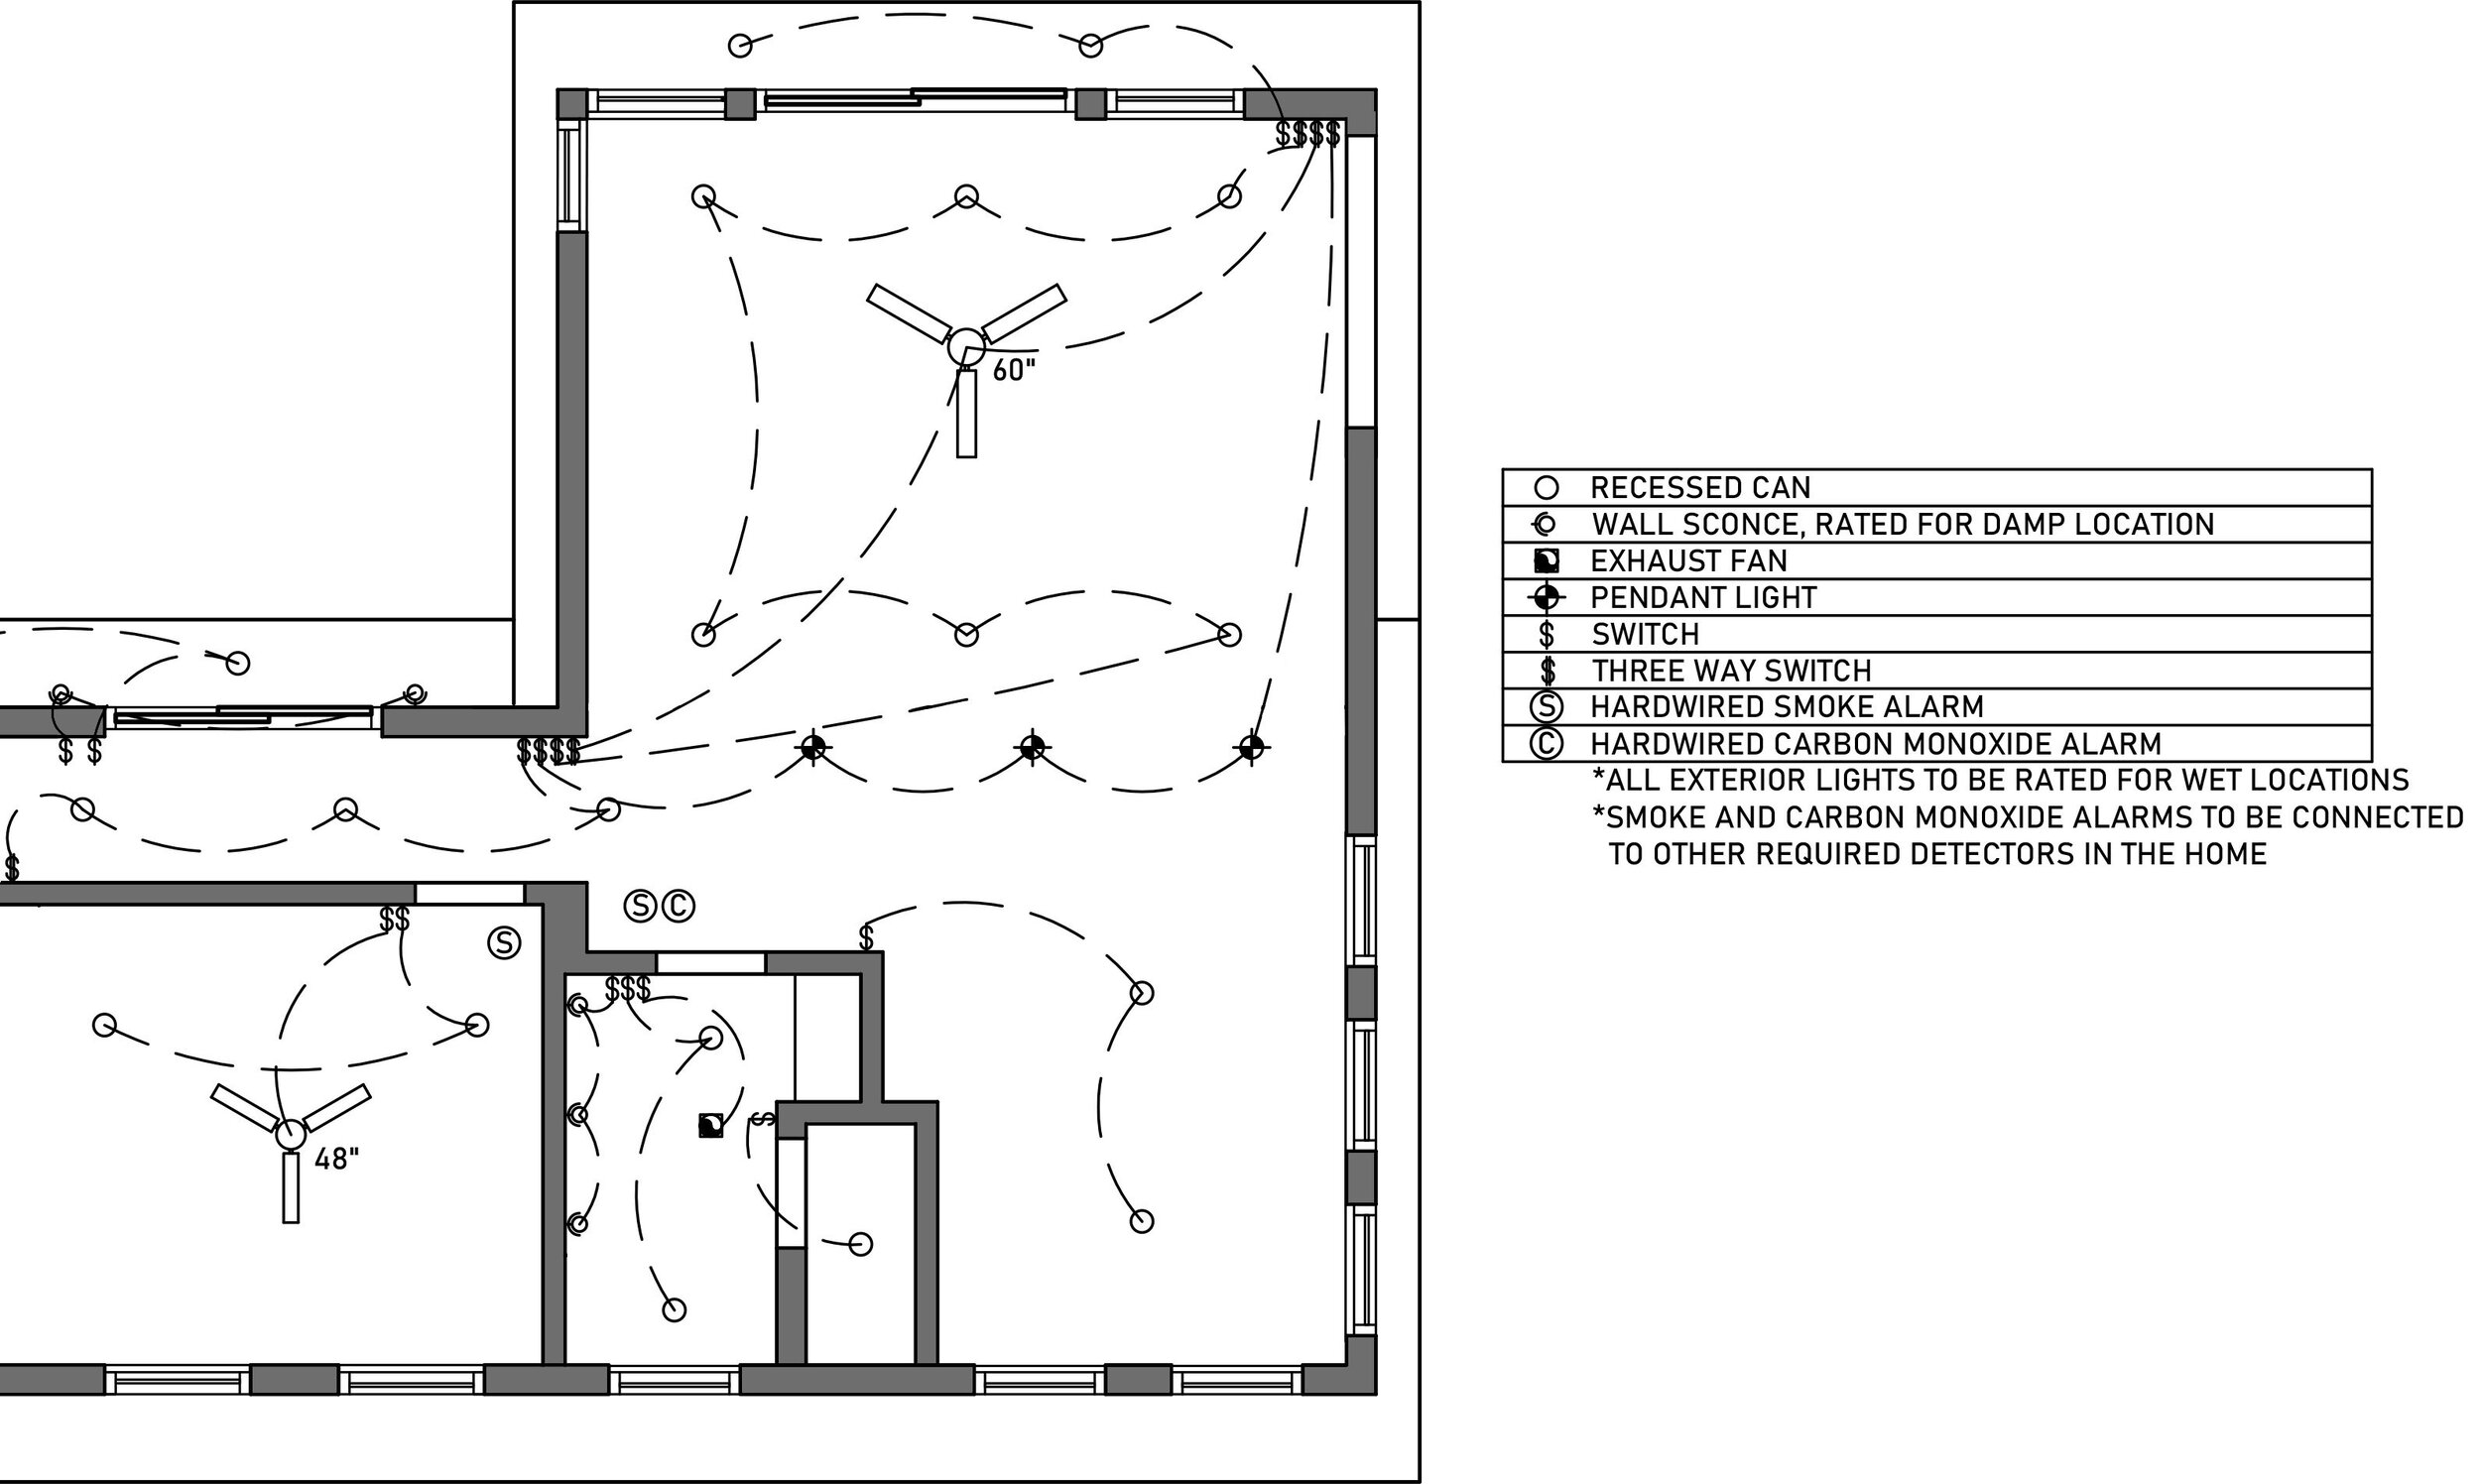
And here’s what one looks like. We’re looking up at the ceiling for several reasons – special ceiling surface treatments, lighting, and life safety devices will be noted. Reflected ceiling plans always come with a fairly extensive legend for fixtures, switches, and things like sprinklers or smoke detectors. Each fixture will have its own symbol and will be listed in the legend.
Proper lighting design is a huge deal. Well-distributed illumination is important in creating a visually comfortable room without glare or dark pockets. Many times, I’ll dimension the fixtures to let the contractor know exactly where lights should be placed in a room. Reflected ceiling plans should also show fixture switches so that they aren’t accidentally installed behind doors or in awkward corners.
Sometimes, my RCPs are combined with Electrical plans – if a homeowner wants to make certain that outlets are on either side of a bed for a bedside lamp plugin, for example, I’ll draw those in these plans as well. For the most part, though, we leave that to the electrician. They’ll abide by the International Residential Code, which has very clear instructions for where outlets should be placed and how far apart they should be.